OCtober to December 2011
Earlier this year I built an experimental parabolic mirror to see how effective it was at heating water. Whilst it showed some potential and got a small water tank up to a reasonable heat fairly quickly, it was not that practical due to its size and the requirement to track the sun's movement.
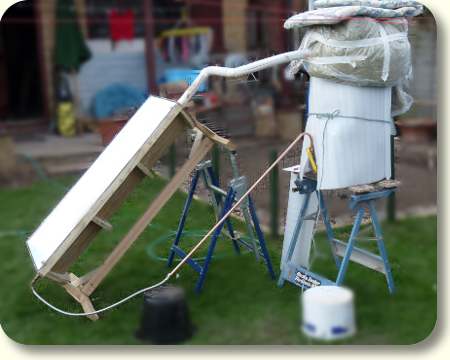
A different idea was to make a solar hot air heater that could potentially provide some background heat into the house. As we drink a lot of pop I started saving cans and used them as the solar collector in a very simple heater.

The heater consists of a box with an area of 1.5 square metres. To so stop heat escaping from the back surface of the box, it is lined with 50mm of Rockwool slab.
The cans are pierced both ends to allow air to flow through them, they are then glued together with decorators caulk. In total 180 cans have been used in 10 rows of 18 cans. The cans were then painted black. The top cover of the panel is a sheet of twin wall polycarbonate.

Air enters the panel in the bottom left corner passing both through and over the cans. The top right corner has a four inch fan which draws the warm air out. The fan is a discarded computer cooling fan.
I trialled the panel on a clear Decembers day, the outside temperature varied between 8 and 10 degrees C
The output from the panel varied between 30 and 45 degrees C

Over the last few months one of the projects that has taken quite a bit of my time is the redesign of the ICOM Energy Association website. It's been quite interesting delving into the workings of PHP code and interfacing with a MySQL database
One of the more important areas of the website is a closed members area that has required quite a complex user access system allowing different members the ability to only access the areas of the site they have subscribed to. The functionality of websites built around PHP and MySQL is really impressive. The sites can be so much easier and more efficient to construct and use. The site should go live in the first week of 2012.

Constructing the site has meant I have been able to break away from the relentless paperwork the job requires and indulge in a little bit of graphics work. All the images and navigation buttons in the head banner have been created in Blender and Gimp. Its always good to open a new release of blender and see just how much it has developed and changed. On the down side it means you need to relearn where all the controls have moved to.
June to September 2011
It's amazing that when you've got all good intentions to get stuck into a project, life sometimes has a habit of getting in the way. Back in April & May I redesigned my website with the intention of getting up to speed with the new layout of Blender and writing a few more tutorials, I had even been asked to write a book by a local publisher. The end of May though I took on a new job as Technical Director and Deputy Chief Executive of ICOM Energy Association. The job has taken up a great deal of my personal time reading up on European and British directives, regulations and standards. I have had almost no time for my hobbies and had to put getting up to speed with Blender on the back burner. October sees another change, with the current Chief Executive retiring and me taking over his work as well as the technical roll. All this means it will possibly be winter before I have any serious free time for new Blender projects.
I have in between other work, been keeping an eye on Blender and am very impressed with the pace of development. The Bmesh system has taken on a new pace of development that should see it integrated within the next four to six months. Hopefully I will then have the free time to write a few more modelling tutorials and update the Precision Modelling Guide.
Cycles render engine is also looking extremely promising. As a test, I have re-rendered the Trumpet model with Cycles and it has achieved a far better result than I could previously achieve in Blender's internal renderer.

The original model was constructed in 2007, but I never managed to achieve the polishe metal effect. Original Trumpet render

Compare a higher resolution image of both renders in the Gallery section.
May 2011
It's all change for me again this month, a new website layout and a new job. The big one for me is the new job. The need for me to be in the car and drive for over 3 hours a day every time I needed to be in the office at Cheltenham, finally wore me down. Fortunately I have secured the position of Technical Director and Deputy Chief Executive at ICOM Energy Association, which will mean a lot less travelling to and from the office. Over the last year I have spent almost 300 hours travelling to and from Cheltenham, which is why I have not had time to add any new Blender projects or tutorials over the last two years.
My website was getting to the stage where I needed to split the 2010/11 tab into separate years and I also wanted to add a new menu item, to list some of my progress with learning the piano. In total the site had 70 pages and to update the site, each page would need the menu altering. To save having to repeat all the work again at some point in the future, I decided to read up on PHP driven websites. The beauty of PHP is you can include a single head banner, menu and footer file into all of your web pages. The redesign has also added the possibility of a drop-down menu, which is much easier to maintain and the gallery utilises a light box to open the images. If you maintain a HTML driven website and are a little apprehensive about making the move to PHP have a read of Kevin Stanley's tutorial, How to Create a PHP Website Template from Scratch it explains the process really clearly.

April 2011
Its been a busy time for software updates this month. The first stable release of Blender 2.57 was released on 13th April prompting a fresh look at the progress of this excellent software.

Blender 2.57I am often asked by users when the 608 bearing tutorial will be updated for the new look and functionality of Blender.
Whilst I don't have that much opportunity to use Blender any more, I am still keeping an eye on progress of the upgrade. As yet I haven't found a way to snap the knife to a vertex and constrain the cut in a straight line. Until this feature returns (possibly not until the B-mesh integration) it wont be possible to carry out all the steps needed to update the tutorial.
Not only have we been spoilt with a new release of Blender this month, it's also coincided with the release of Ubuntu 11.04. This new release featuring the Unity desktop with the impressive side bar that looks very slick. I have only used it for a couple of days, but already my most used applications have jumped to the front of the menu's making it much easier to access them. I don't think it will be long before most users grow to appreciate the new structure.

I have carried out a few more experiments with the parabolic solar reflector this month. The copper water tank has been cut down, removing the leaking heat exchanger, then re-soldered as a smaller tank. The tank has also been insulated with a couple of inches of insulation. The reflector surface has been changes for the 95% reflective hydroponics film purchased last month.


On a quick trial the water temperature at the top of the reflector reached 81\B0C. This has worked reasonably well but there are a few more improvements I want to try before I am finished with the design.
March 2011
My parabolic solar reflector has advanced on a little more this month and I have been able to carry out a couple of very unscientific trials to get a feel for how much heat can be generate by this type of design.
Firstly though I must stress this is a very basic prototype made from scraps and leftovers. I haven't invested any money into the set-up shown in the photo's. It is just a test bed for future ideas. It is pretty evident that this is pieced together from scrap.

Since last month I have covered the parabolic curve with thick reflective aluminium foil. The drawback from this material is that it picks up every bump or ripple in the glue layer beneath it. Though it conforms to the parabolic shape quite well, the surface does lose some of its reflectivity and tends to diffuse a proportion of the sunlight hitting it rather than focussing it directly onto the heat tube.
The first test has used a basic solar syphon with an old copper water tank. I wasn't taking temperature measurements as the day only had short periods of sunshine inter-seeded between a cloudy sky.
the results were that the uninsulated tank became tepid in the top third of the tank and when improvised insulation was added to the tank the water was raised to a temperature, comfortably warm enough to wash in. The heat pipe running through the mirrors focus became much too hot to touch, even when full of water, though it was a little cooler at the bottom of the reflector.
The outcome of this is to make a few improvements and try a slightly more efficient set-up.
I have sourced some 95% reflective hydroponics film from Hobby Hydroponics at less than \A33.00 per square metre. and am looking for a local supplier of acrylic tube to insulate the heat pipe.
The water tank has been chopped in half to remove the existing imperial fittings and corroded heat exchangers. I will add a coil heat exchanger (old 10mm copper tube) to saperate the solar flow from the tanks water and insulate it to a much higher standard.
Once the changes are made I will carry out another trial and hopefully post the results and a few more images next month.
February 2011
This month started with a bit of a shock, Scottish Power who supply both my electricity and gas emailed me with a message telling me that the payments for my energy bill was going to rise by 55%. This was bad news, especially after spending a few years gradually improving the thermal resistance of the house, initially to save energy costs, but also to do my bit to help reduce the environmental damage ot the high carbon society we live in. The sad thing is that I pay by monthly direct debit and even though we are at the end of a particularly cold winter my account is still in credit. Anyway the increase in price is completely unjustifiable so I have challenged it and am currently going through the Scottish Power complaints process. I will be posting more on this as things develop.
What it has done is spurred me into starting the solar projects I had been thinking about for the last few years.

the 1st project will be to construct a parabolic reflector to see if I can get some useful heat from the UK climate. The parabola will be a bit more of a challenge than a flat plate collector as it needs to track the movement of the sun. I think I will be able to build it quite cheaply with redily available building materials. I will post progress on the build as It takes shape.
The initial design was done in Blender and has given me a enough of a start to be able to cut out the material and construct the shape of the parabolic curve. So far it has all been made from leftover materials.
The curved supports are laminated from left over softwood joists, with the face of the parabola made from 25mm floor laminate boards faceted over the concave surface of the curved supports.


I will be experimenting through the summer with coverings of polished aluminium foil and possibly aluminised mylar sheets.
January 2011
I have decided to have a go at something a little different this month. Having spent years concentrating on mechanical models I decided to have a go at modelling and rendering a face. Organic modelling demands a completely new learning curve compared to what I am used to. As a first attempt I am really happy with the outcome, though as always it could be improved significantly given more time and skill.

Blender provides an excellent tool-set to work on organic modelling though it takes a lot of research and learning to ensure the topology of the wire-frame is suitable if you want to later animate the face model.
There is a lot of good reference to face topology and in true open source many are freely available. The tutorial I used that helped me learn the basics wasn't originally written for blender but the techniques are very similar and the tutorial gave good advice on the positioning of mesh poles and loops. The tutorial can be downloaded from computerarts and is a must read for anyone struggling with the concept of face modelling.

Once you have created the model of the face a realistic texture needs to be produced to give a realistic appearance of skin , lips eyes etcetera. Again Blender excels in its tool-set for unwrapping a 3D mesh into a 2D UV map and it was a simple process to mark a few seams and use Blenders powerful unwrap tool to create the 2D map of the face layout.
Fortunately Blenders tools don't stop there and leave you to hand paint your own image texture. You are now able to project different face images onto the model using multiple UV maps and from these create the face texture using the projection paint tools. Alternatively you can use many of the shader techniques to achieve a realistic skin.

Finding good reference material and explanations of the techniques wasn't easy, but there are a number of very good sites going into detail of these processes.


