December 2008
Towards the end of last month I decided to to start a project to help me learn some of Blenders Animation Tools and more specifically the ones that can be used with mechanical modelling. Constructing the rig for the back actor of a JCB has been a challenge, but that's simply down to my lack of knowledge of the tools and techniques. Once I had read up on the tools and knew a little about what I was doing, the rig went together without any problems. I wish I could say the same for the front bucket rig, it looked simpler at first but incorporates a lever mechanism to stop the bucket tipping back to far when the main arms are raised.
At the moment I haven't found a way of automating this movement, but I am hopeful that a solution will eventually be found. I have started a Work in Progress thread for the JCB on the Blenderartist forum where you can track the progress of the project. A description of the front mechanism problem with diagrams is also on the thread, so any helpful advice on how to automate the bucket movement would be appreciated. When I have finished the JCB I intend on adding a Projects page to the Graphics section of this site where I will put a making of article detailing some of the new tricks and techniques I have used, that might be useful to others that are learning Blender.

November 2008
One area of Blender that I haven't had much experience with is its animation capabilities. As animation is probably the main purpose for Blender, I thought it would be good to have a go at rigging and animating, though with a bias towards animation of machinery rather than characters.
There's a lot of information on the internet on setting up constraints for mechanical rigging and a very good tutorial in the Blender 2.3 Guide which is still very relevant. The problem I found is most of the information is based around setting up a simple Piston and Cylinder and there is very little on anything much more complicated. It seems all the discussion on Blenders armature system revolves around its use as skeletons for characters, rather than the constrained movement of machinery.

As a project to allow me to get to grips with armatures and constraints I thought it would be good to have a go at modelling an excavator's back actor. Most of the constraints are based around Piston and cylinders tracked between simple pivoting arms. There is however a complicated fulcrum arrangement that allows the bucket to rotate at the end of the excavators arm. As a starter I have modelled 2 dimensional shapes of the excavator to help me set up the constraints, I can then add the 3D models when the animation rig is working correctly.
A Few Tips on Mechanical Rigging with Armatures


October 2008
Its good to see yet another release of Blender, now up to 2.48 with some great new features and substantial improvements to the game engine. One small modification worth a mention is the improvements to the Boolean Modifier, the results from a few trials I have carried out extracting the face of Suzanne from a subdivided cube seem to work faultlessly. With these results Boolean operations can play a much greater roll in speeding up the modelling process. I haven't yet got around to finishing off the 608 Bearing video tutorials, but I did find a little time to add a 5 part tutorial constructing and texturing the gear below.

The tutorial covers the basics of creating a gear model with the help of the Blender Mechanical Gears script by Stefano Selleri. Unwrapping the gear into a UV layout. creating an image texture for the metal grain and adding embossed lettering to the gear. Hopefully there is enough information in the tutorial to allow you to use the techniques on you own models and add that extra bit of realism to to the final technical illustrations.

Update: The Gear Tutorial was withdrawn in August 2021 as it is completely out of date.
September 2008
This month I have completed my switch over to Ubuntu Linux and have been more than pleased with the ease of which I was able to get it setup. The graphics glitch mentioned last month was simply down to the fact that I had got the Extra visual effects turned on and my old graphics card couldn't cope. Switching back to no effects cured that problem (thanks for the pointer Terry). Also getting my MIDI keyboard working was a lot less painful than on Windows and the amount of quality music creation software that is available for Linux is unbelievable. The only problem I am finding now is that fact that there are so many new things available to explore and play with, I am not finding the time to continue with any of my current projects. Hopefully in October I will regain a little bit of discipline and get back to completing the video tutorials for the 608 Bearing. Whilst I was clearing out my hard drive I came across an old Blender key framing and alpha wipe animation test of the Chimney Pot Chess Set and uploaded it to Vimeo.
August 2008
Because I have spent a lot of my free time this month getting my PC to duel boot Windows and Ubuntu Studio, I haven't had much time to do anything with the Web Site. Rather than rushing something to add to the site I decided to post a couple of pieces I have been doing at work for the new Flue products brochure. Matching a 3D model of the flue and wall into an existing stock photo was the biggest challenge, estimating the cameras focal length and position takes a lot of trial and error. Both images were created with Blender and post processed in Gimp. I will post a link to the brochure when it is completed and uploaded onto the Red Bank site. Being completely self taught in graphics I am pleased that my work is now of a sufficient standard to be included in commercial projects.


Both the images are posted in the Gallery and have been included with kind permission of Hanson Red bank.
Ubuntu turned out to be completely pain free to install, its been my first success with Linux. There are a few issues to overcome but I am confident my home computing will soon be on a totally Open Source setup. The main issue I have at the moment with Ubuntu is that the Blender render window sits behind the main blender screen, when I Alt-Tab it to the front it doesn't update or crashes Blender. Its possibly something thats easy to overcome, but being a complete Linux novice, I haven't found the solution yet. If anyone has any pointers I would greatly appreciate any help I am given.
July 2008
What a hedache this month has been; things were progressing nicely over the last couple of months, all my pages had been transfered over onto the "UNLIMITED BANDWIDTH" Web host I now subscribe to and I was busy recording a few of the 608 Bearing Tutorials, when WAM without warning my site was taken down by the host. After a couple of Emails and Phone Calls it was explained that on 30th June there had been a bandwidth spike of over 5.48 GiB in 1 day and it was all coming from the pdf Guide. I had to remove the guide from the site before they would reinstate it. Unfortunately my google stats and server side stats don't show any spikes in traffic, just a steady flow totalling 10.2 GiB for May and 7.26 GiB For June and google stats showed only 2 downloads on 30th June and 23 on 29th June. So the host scores 0 out of 10 for customer service. As a hobby site Its more of an inconvenience than a major problem. Had I been running a business from the site it could have been very costly, imagine having a successfull advertising campaign and finding your site taken down at the most profitable moment. Hopefully this will act as a warning to others, you dont always get what the glossy front page offers and check the small print. My provider states If they cannot handle the bandwidth they will take the site down and offer a full refund. Hardly unlimited.As a footnote the Precision Modelling Guide is back online for now at my Internet providers space.
Thats enough moaning so on to the positive stuff. I have finally found time to do some personal Blending. With the release of Luxrender 0.5 I thought I would have a go at a simple scene and see what difference an unbiased renderer would make. As I am using an old computer I kept the scene simple just 3 coloured glass tumblers and left Lux going for 3 days whilst I wasn't using the computer. There is still a bit of noise in the image but Luxrender shows great promise and is developing at an incredible pace.
Although still at an early Beta testing stage Luxrender appears fairly user friendly and easy to learn, it's well worth checking the renderer out if you are interested in making high quality unbiased renders. More details can be found on www.luxrender.net.


On the back of the tumbler image I thought it would be good to try out a more complicated engineering type ilustration, unfortunately the gearbox workings were too complicated and I was unable to get them into Lux. As a first stab I have rendered the gears using Blender with the new Glossy Reflections feature which has worked well. This will be another model I come back to when I have a faster computer.
June 2008
I hoped to achieve a lot on this site in May, as usual something else got in the way. Work commitments became all to serious with the UK solid fuel appliance manufacturers, HETAS, SFA and the Renewable Energy Association asking me to make the Industry presentation to the Governments Industry Advisory Group for the 2010 Building Regulations changes. Needless to say the presentation was graphics orientated rather than the usual text and talk. In all around 30 hours was spent of my own time researching and creating the presentation, time I wanted to spend on this site. Still I did manage to bring over the remainder of the pages from my old domain and give them a face-lift.
This month I decided to try my hand at producing a few video tutorials and I thought it would be good practice to port the Precision Modelling Guide to video as well as the .html and .pdf versions. Its becoming real mixed media learning experience for anyone interested in this type of modelling. The video tutorials are embedded at the bottom of the corresponding web page. I would be interested to know if anyone found them useful, or if my dulcet tones were too much to bear, comments in will always be appreciated. Whilst I have been working through the video's I noticed that some areas of the guide have become out of date compared to the new features in Blender 2.46, I am slowly updating the web pages with the changes and when finished will add an updated .pdf guide.
I haven't managed to complete any personal Blender work for some time now, however I am using the program more and more at work. This month I have produced a number of graphics for use in Hanson's sales literature and it sounds like there will be more to come.
Update: The videos were withdrawn as they were completely out of date.
May 2008
I have now brought all my tutorial pages over to the new host, so hopefully there are no more redirects back to here.
April 2008
This has been a really busy month for me, my site was getting close to filling up the available space allowed from my web provider and after finding a 3D viewer that I wanted to use on my site, I found my provider didn't allow JavaScripts. So this month I have bit the bullet and paid for proper web hosting. Rather than just transferring my site to the new host I decided to give it a face lift and in the process learn a little bit more about CSS and HTML With the work of moving the pages of my old site still progressing, some of the links from the tutorials section will be temporarily redirected back to this page, I hope it doesn't cause too much inconvenience. Next month I hope to complete the migration of the tutorials sections and possibly start adding a few new video tutorials.
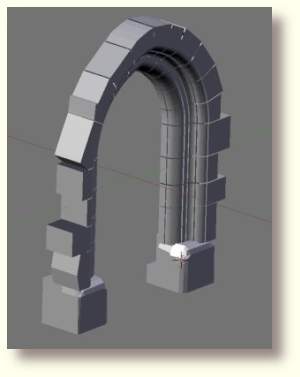
The 3D viewer that my web provider wouldn't allow is the "3D No Plugins" viewer from Thorsten Shlueter www.thoro.de. it allows you to take a series of images of your model which can then be rotated on the web page using your mouse.
Click the link opposite to load a model of the priory arch which you can rotate . Once loaded the model can be rotated horizontally and vertically using the left mouse button.
Update: The viewer is no longer supported.
March 2008
Seeing I haven't done much Blending since finishing the Placka Image in October last year and with the release of 2.46 imminent; I thought it was time to get into another Blender Project. With the 2.46 release candidate 1 available on the Blender website, It's will be a good opportunity to start a project that used some of the new tools and features, so this month I have set about learning how to use some of them. The scene I am contemplating will be based on an old ruined Priory a few miles from where I live. Some of the stonework is still standing but very decayed.

The only remaining archway of the priory and its surrounding stonework.
I am modelling the stonework with the detail it would have originally had when carved by the masons hundreds of years ago then, I will then carve out the erosion with the sculpt tool. You may be thinking there is nothing new in that, but I am using an old slow computer. To make it work I am limited to about 750,000 vertices so I will need to sculpt each stone individually and then bake a low polly normal map from it to use in the final scene. Blender 2.46 rc1 supports baking of tangent space normal maps from a high polly mesh to a low polly mesh allowing you to create large detailed scenes even with limited hardware.

Left Image: Sculpted High Polly Model &nbs;Centre: Low Polly Model &nbs;Right: Low Polly with Normal Map
As a rough first trial the left image above shows a basic high polly sculpted stone. The centre one is the low polly version without any detail and the right hand stone is the centre low polly model with the normal map added. These are just a rough first trial the finished stones will contain a lot more detail and have a painted diffuse map that will hopefully produce a convincing decayed stone feature.


February 2008
Firstly a big thanks' to everyone who has commented on the Precision Modelling Guide, the feedback has been really encouraging. Those of you who have emailed me pointing out a few of the typos and errors that were included in the first upload of the Guide, your proof reading has been invaluable and I have updated the guide several times, adding the corrections as they have been pointed out to me. The Guide is now on revision 005, so if you haven't got the latest version with Robert Burke 005 on the bottom left of the cover page, you might want to download the corrected document.

The Precision Modelling Guide is now withdrawn as it is completely out of date.
With my workshop becoming a bit more organised, I decided to concentrate a little more on adding tools and equipment to use with my furnace. As its no good having the capability to melt aluminium if you can't cast it into anything, I decided to use the boards salvaged from an old wardrobe to make a Cope and Drag. As usual the design was worked out using Blender. For those of you not familiar with casting, a Cope and Drag are used to retain the sand in a sand casting mould.

The parts list and basic assembly of all the components are detailed on the Engineering Projects page.
The cope and drag worked well on a trial mould and casting. As the year progresses I have got plans to make a lot of components and many will need basic castings, the cope and drag will no doubt be put to good use. From this basic design I have made a number of different sized copes and drags. All of them made for free from salvaged materials.
January2008
Its the first anniversary of rab3D this month and I must admit the site has come a long way in the last twelve months, much further than I first thought it would. To everyone who has commented on my work over the last year, either in the forums or by Email I would like to extend a big thank you. Your encouragement has helped keep me focused on extending the sites contents and making this a useful resource.
Last month saw me complete the Blender Precision Modelling tutorials, it ended up being a lot more work than I first intended but it has been well worth the effort. After being on the web for only a few weeks, the Precision Modelling Guide has been downloaded by over ten thousand people. This coming year I intend to concentrate more on materials textures and lighting, so keep a look out over the year as I may be adding a few more Blender tutorials.


