December 2018 - Blender 3D, Graphics and Hobby Home Page
Classic Austin Mini Rebuild Project
Last month I mentioned I would probably need to turn the Mini body upside down to repair the excessive corrosion in the floor pans. Fortunately I have built up a good collection of salvaged steel box section, channel and angle iron so making the frame shouldn't cost much more than a set of heavy duty castors. Knowing the material I have available I set out using Blender to design the components that need to be fabricated. Once the shell is stripped bare and the subframes removed I will know the exact mounting locations for the frames.
For now I have roughed out the basic mini body shell and added where I think the framework will need to locate.

The .gif animation above gives the basic idea of the rotating jig.
Knowing that the engine runs, I have also put some time this month into stripping out the interior and removing the engine. It is not until a lot of the components are removed that you begin to see just how much work is needed to bring the bodywork back into rust free condition.

Blender 2.80 Book
It's quite a learning curve moving to the new interface and techniques offered in Blender 2.80. The major change in the organisation of models and scenes is to now use collections and view layers in place of the old limited 20 layer system. There are some great advantages with the new methods but with very limited information available about their use, documenting the best ways to use them has necessitated an awful lot of experimentation to learn exactly what they can do.

The Blender file of the Mini rotating Jig shows just how much better the organisation of components is with Blender 2.80, allowing you to organise collections into nested groups that have relevance to how the model is assembled.
The book is growing very quickly and organising the structure of the book has also meant further learning in Libreoffice. To help keep things organised I have ported the work so far to use a master document structure allowing each chapter to be its own file.
I will give a few updates on the Blender 2.80 Guide as I progress over the next few months.
CNC Project
With the first L297 based Dual Full-Bridge bipolar Stepper driver running successfully, I turned my attention to the double driver board. I am not intending to push the stepper motors to their limit so hopefully heat won't be too much of an issue, but just in case, i have improvised some heat sinks from aluminium angle.

I still had an old casing from a desktop UPS and the duel boards fitted nicely inside leaving enough room for a breakout board and power supply.
The next couple of months are going to be challenging for time as I need to concentrate on the Blender 2.80 book and Mini rebuild. I will probably park this for now and get back to the CNC build in the Spring.
Robert Burke - Portraits & Art
If you would like to commission a pencil portrait please visit my Robert Burke - Portraits and Art website for more details.
it would help me Immensely if you would like my "Robert Burke - Portraits and Art" Facebook page and share it with others. The further my websites are spread throughout the web the better the chance I will have of maintaining and continuing with future Blender and drawing tutorials.
Robert Burke - Illustration
My technical Illustration website is progressing slowly between other work and projects. The site showcases a little of what I can do towards the creation of the more technical type illustration or graphics.
If you are in need of technical or engineering type illustration for your technical manuals, training or sales literature please dont hesitate to contact me via the contact link on the illustration website www.robertburkeillustration.co.uk

Follow my Technical Illustration page on Facebook
![]()
November 2018
Blender 2.80 Book
Back in 2012 I started working on a new Blender Guide Book for the Blender 2.6x series. Unfortunately work got in the way and and it was one of the projects I had to put on the back burner. With Blender 2.8 on the Horizon and the first Beta release being made available at the end of November, my thoughts have moved on to updating the work I had previously done and finishing the Guide Book for Blender 2.8
Blender 2.80 Beta Splash Screen


Austin Mini Rebuild Project
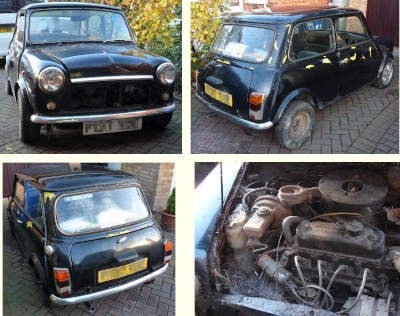
It Runs, after a little bit of tinkering with the Minis engine I managed to get it started. All it took was to rig up a temporary fuel feed to the carburettor and to clean and reset the points. That's the good thing about older engines, no need for an OBD11 device to read fault codes, just old fashioned detective work on the ignition and fuel systems. I am really pleased that there's no frost damage and the coolant system still holds water after 7 years standing.
As the Mini sits so close to the ground it wasn't possible to see the state of the cars underbelly and once I had the car up on axle stands it was clear it had suffered some significant rust damage on the floors and sills. There is going to be a lot of work needed under the car so my thoughts have moved on to designing a rotating jig (car spit roast frame) so I can turn the car upside down. For now though I will work on dropping the engine out and stripping all the components and glass from the body.

Robert Burke - Portraits & Art

Bird of Prey Collection - Gyrfalcon, Eurasian Eagle Owl and Eagle
I have added to my birds of prey collection this month which now includes an Eurasian Eagle Owl.
October 2018
CNC Project
The first go at etching a circuit board wasn't too suckessful, but after a few experiments with UV exposure times and improvements to the the mask by doubling up two prints of the layout, I produced a successfull printed circuit board.

My initial trials were on a single Stepper Driver and having tested the circuit with a pulse generator was pleased that it worked first time. So it is now onto the double driver board.

Austin Mini Rebuild Project
The old pottery shed roof has been stripped of the old rotting OSB and felt roof and replaced with 20M2 of box profile steel roofing sheets. For the moment it's become a dry storage area for all my wood working machinery, pottery equipment and my old CNC router project. Theres not a lot of room left in there, but at least I have managed to empty out the garage workshop and get the Mini indoors.


September 2018
CNC Project
I haven't done any more on the design of the CNC Router framework, but my attention has moved onto the electronics. After building my 1st Machine back in 2005 it was built as a learning aid to see if I could learn enough about electronics to design my own stepper motor drivers. I soon realised the basic electronics I had designed based on dropping resistors were completely under powering the stepper motors. I did a little research and brought a number of L297 and L298N semiconductors from STMicroelectronics to make a Dual Full-Bridge bipolar Stepper driver. Never having got around to doing anything with them I have recently designed a circuit board based on the schematic that comes with their technical literature. Again probably not the best software for designing circuit boards, but as I am very proficient with it I chose to use Blender to design the track layout.

Printed Circuit Board layout for 2 Bipolar Stepper Motor Drivers.
My intention is to print this circuit onto copier transparency film and use it as a photo mask to etch a circuit board. I have made a simple light box with a couple of UV black-lights and will expose a photoresist circuit board using the mask, etching away the unneeded copper with ferric chloride solution.
Austin Mini Rebuild Project
Robert Burke - Portraits & Art
A few months ago a friend was about to scrap an old Austin Mini that had been parked up off the road and left under a tree for over 7 years. Not wanting to see the car stripped for spares and the body crushed, he offered it to me to see if it could be restored. The car is suffering from a lot of bad body work repairs the usual bucket loads of rust and a two pack paint job that has failed to stick, and is pealing off.
Before I can have a serious look at what is involved I need to clear my workshop of all the woodworking machinery that's filling it up. This means re-roofing my old pottery building to stop the leaks, so the old rotting Oriented Strand Board and felt roof needs to be replaced with a box profile steel roof. It looks like I will be busy over the next month or two.
August 2018
I was really pleased to see the first release of a new open source Photogrammetry Pipeline that uses a very easy to understand GUI rather than the command line. Meshroom brings together a number of processes to analyse a series of photographs of an object and reconstruct the object as a textured 3D model.
To get a mesh out of Meshroom you will need a set of in focus, sharp, and high resolution photographs taken randomly around the object. The camera needs to be in manual mode with the same aperture and speed settings for all the photographs.
As the program needs an Nvidea CUDA enabled graphics card and a reasonably fast computer.
My first attempt was to reconstruct a small ceramic elephant. I took around 50 photos randomly around the elephant, outside and not in the best lighting conditions, however the program was able to recreate it as a mesh model in around 1 hours processing time.

Ceramic Elephant Recreated in >> Meshroom <<
The models can be imported into Blender and the mesh cleaned up to make it manifold and suitable for printing.
The CNC router project is also moving with a new design for the stepper motor mounts and carriage bearings. As I aim to use threaded rod again instead of expensive ball screws, the drive needs to double the rotation of the lead screw to improve the speed of the machine. Blender has been very useful in designing the drive, even down to sizing the timing pulleys and belt.

June & July 2018
Blender 2.80 Modelling Guide Book.
The past couple of months has seen a major heatwave here in england with daytime temperatures topping out above 30�C on a few of the days. As this never lasts in our temperate climate, I have been making the most of it getting out and about with a few trips in the camper and a lot of days walking the local countryside.
One major project that needed doing was a little bit of DIY removing the 1980s mock beams on the ceiling and re-plastering the dining room. Once the beams were down, It was obvious that it would be easier to re-plasterboard the ceiling rather than trying to skim over the rough plaster. Next time I plan to do a job like this i will try and time it not to coincide with a heat wave.

One slight mishap was my Yamaha Clavanova piano the sustain pedals stopped working. It turns out that when moving it around the room we must have rolled over one of the dogs balls or something of that sort of size as the circuit board that send the signals from the pedals had broken. I would put it down as a design fault as the circuit board was well protected in a metal housing, but the circuit board wiring connector protruded through the bottom of the housing. This meant anything slightly bigger than the gap between the underside of the connector and the floor had the potential of breaking the circuit board if the piano was moved over it.

I managed to make a temporary repair of the board by drilling through three of the wider tracks and pulling the break together with copper wire, then soldering the copper wire in place. The micro tracks were much more difficult soldering 0.05mm2 wrapping wire to bridge the breaks took a real steady hand. The repair isn't pretty, but at least my piano is working again whilst I search for a supplier of a replacement board.
Blender has taken a back seat these past months, but I am in the early stages of starting a new CNC machine build project and been roughing out in Blender what will be a stiffer, yet lower friction design than my previous router. Also I am designing new circuit boards to utilise the L298 Duel Full Bridge Driver. Keep an eye out as I will post more as the project progresses
Robert Burke - Portraits & Art
In June I attended the Leonard Cheshire Disability Newlands House and Village Feit, which meant purchasing and setting up a 3M square covered gazebo. With lots of visitors to the Feit my portrait work was well received and I had some great comments from many of the people that attended.

Also a few new drawings went out to customers.

May 2018
I have been concentrating on preparing my VW camper van ready for a lot of travelling this year. It has also been a busy month for pencil portrait work, so unfortunately there isn't much to show on the Blender or Technical Illustration front.
Robert Burke - Portraits & Art
I was one of 50 artists exhibiting at the three day Lichfield Festival of Artists this month. It was a great experience with thousands of visitors coming to see the excellent and varied artwork on display. It gave me the opportunity to do a live demonstration of my techniques and I chose to draw a horse. There was too much work and far too much talking to complete it at the exhibition, but I managed to complete it over the following two weeks.

Work In Progress OF Horse in Graphite Pencil
April 2018
Blender 2.80 Book
I returned to do a little more refinements on the Spitfire Mk9 cutaway model this month. There are always areas you can look back at and think I wish I had done that differently, so I decided to make a few modifications / additions.
There has been some good feedback about the 2D views of the model, even making the Blender artist gallery, however static images never do justice to a complex 3D model. With that in mind I left my computer working for a few nights to render the 360 degree rotation video below.
The video is also on my technical illustration website www.robertburkeillustration.co.uk which is slowly taking shape.
Video opens in Youtube Window

Robert Burke - Portraits & Art
Besides commissions I have added another personal work to my Portraits and Art website, this time an eagle. This is the second bird of prey drawing and will be part of a collection I am planning to draw.

March 2018:
Ball Valve Project
In a bid to add content to my Technical Illustration website, I have took a break from the Industrial Robot Project which is going to take me quite a few months of spare time to finish, to concentrate on a smaller project.
The ball valve below was modelled using a number of references picked up off Google images and not representative of any one manufacturers product. The model is used to show a representation of how they work and a generic idea of what components are used to make up the ball valve assembly.
The ghosted image below is made up of three images and uses CSS with a little java script to transition between them. I also have a CSS only version working on my www.robertburkeillustration.co.uk website.

The idea was to create an animation of the ball valve fading to a cutaway section and then showing the the water flow stopping and starting as the valve is operated.
To show how the ball valve is assembled, I have also animated an exploded view of the components coming apart and then reassembling.
The hope is the video below will show the type of freelance work I can create to add to training presentations, websites or company brochures etc.
The video opens in a YouTube window

Robert Burke - Portraits & Art
I have added another personal piece to my collection this month, which was quite a challenge as the reference photo had very little contrast. The sleeping fox also has the most scruffy, complex fur I have drawn, quite a time consuming project but satisfying to complete.

February 2018:
Industrial Robot / Palletizer Project
The industrial robot / palletizer project has advanced very quickly this month, mainly because the February weather isn't the best for outdoor activities, so there is more Blender time.
Also as a bit of a rant, it was because I have been badly let down by Virgin Media who have oversold internet access in the area to the point the local distribution router couldn't cope. Their "super fast broadband" was reduced to being unavailable for most of the days and dropped out the minute you you tried to look at anything more than a basic text page.
The first stage of the Palletizer project was to remodel the industrial robot and the image below shows the challenges you face when importing from a nurbs based CAD solids model to a surface mesh. The cylinder on the CAD model had 74000 vertices compared to the remodelled surface created in Blender of 3000 vertices.

Comparison of Clean Blender Mesh and .stl Converted from CAD Solids Model
Once the model was built I needed to add a rig to make it animateable and to make this easier constructed a simplified version of the robot. The initial rig works okay but requires two control points for position and rotation.

Since this animation I have modified the rig to work with only one control target for both position and rotation.
The model also needed a scene to work in so I have modelled a portal frame shed and pallet conveyor system. The video animation below is a tester to see how the scene will look.
The video opens in a YouTube window

Robert Burke - Portraits & Art
I have completed a few more pencil portraits over the past month or two.

January 2018:
Industrial Robot / Palletizer Project
I am starting this year with a new Blender project, to model, rig, animate and render an industrial robot. Most of my previous projects have all centred around modelling, so this one will focus more on the animation side of Blender and hopefully I will be learning and sharing my experiences with rigging, constraints and animation.
After learning from the Spitfire Mk9 project that you need to collect good references before you start modelling, I am pleased to say that for this project both drawings and CAD models are available from the industrial robot manufacturer. The CAD models however aren't in a format that is suitable for animation as the original solid model has been converted to a triangulated .stl file. There are far to many vertices on the .stl model and they aren't organised geometrically around the models features. The first job will therefore be to create a clean manifold mesh of the robot.

Reference Images for the Industrial Robot
Spitfire Mk9 Modelling Project
After working on this project in my spare time for a full 12 months, I have brought the Spitfire Mk9 project to a close. It's been a great learning experience, especially in the organisation of large complex models and I have picked up some new Blender modelling techniques along the way. The most important thing I have learnt though is to gather all the necessary reference material before you start. With so much conflicting and inaccurate information on the web, I fell into the trap of starting the model with inaccurate reference images and it meant I had waisted a couple of months modelling before I had found dimensionally accurate plans and ended up having to deleat everything and starting again. However, through the process of this model I have learnt a lot more about the Cycles render engine and am pleased with the finished result. A larger version of the final image can be seen in the gallery

Spitfire Mk9 Cutaway Image


